Originally published at: https://roots.io/guides/atomic-deployment-with-sage-9-and-deploybot/
In this guide, we’ll cover how to automate seamless, zero-downtime Sage 9 deploys using DeployBot’s Atomic Deployment method. Why Atomic Deployment? Previously, we covered how to automate Sage 9 deployment using DeployBot. The method described in that guide is a basic SFTP deployment. Pro: it’s compatible with most hosting setups. Con: it could result in…
3 Likes
Hey. Firstly, thanks, if I can get this working it will be very useful!
I think I’m very close to having this working - the build succeeds, and then it starts ‘loading dependencies’ but it eventually fails with the rather random error message -
" 1. output Loading from cache
2. output Generating autoload files
3. output -bash: n: command not found
4. output Post-launch commands failed, but the current application symlink was updated.
5. output logout
6. failure Last exit code: 1"
Is that suggesting it can’t find node/npm? My container has the installation commands for that (and would have failed earlier on yarn:production build’ I would have thought? -
“curl -sL https://deb.nodesource.com/setup_8.x | bash -
apt-get install -y nodejs
npm install --global npm@latest yarn webpack”
FACEPLANT -
“n -sfnr $RELEASE /home/…”
Copy n paste is evil  , missing the l of LN
having said that - " 1. In the Run commands after new version becomes active section, enter ln -sfnr $RELEASE /var/www/mysite/wp-content/themes/my-theme in the code field, replacing /var/www/mysite/wp-content/themes/my-theme with the path to your themes folder followed by the name of your theme"
The r flag here is invalid and what does $RELEASE refer to? Where is this command being run on the server? It seems to break for me at this point.
Hey @cordial - the -r flag for ln is valid. ![]() It makes the symlink use relative paths.
It makes the symlink use relative paths.
At the top of the server config page, there is a link named “Show paths that will be created on your server” (right under the “Application path” field.
If you click that, it will expand a section showing something like this:
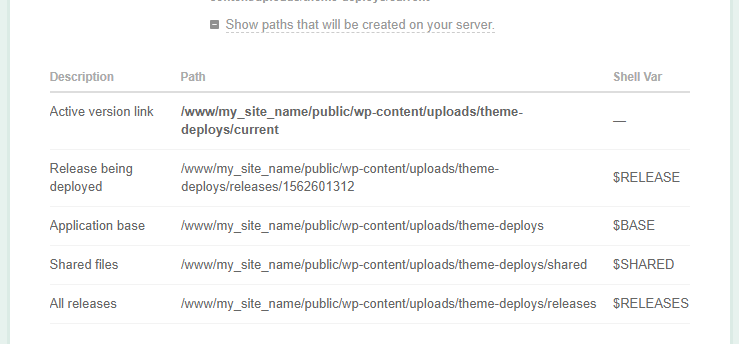
You can see that $RELEASE will be the path to the release being deployed (that latest version from your repo that is being pushed to your server).
This is being run in an SSH session on the server to which you are deploying the theme. So, if that step is breaking for you, you can SSH into your server and try creating the link yourself with that command to see what goes wrong.
What’s the message in the Deploybot log from when things break? Or the symptom on the server/WP side if Deplyoybot doesn’t catch any problem?
Hi. Thanks so much for your reply. I can thank you for your efforts in setting up this post for deploying. I’ve now managed to deploy and all good. However, I still have to remove the ‘r’ flag, if it leave it in I get -
" 1. output ln: invalid option – r
2. output Try `ln --help’ for more information.
3. output Post-launch commands failed, but the current application symlink was updated."
I’m all good though, and deploying away fine. Thanks again.
I’m using a Ubuntu 18 (I think) container.
That’s odd! I don’t get any error message using that flag. My containers still use Ubuntu 16.04, though, so maaaaaybe there’s some difference in the version of ln between the two releases. Would be odd, but who knows.
As long as your site is working, I wouldn’t worry about it!
So i started with Ubuntu 16 and had to bump it up to 18 as I was getting some random library error that I guessed was tied to that OS version and instead of trying to fix i leapt into the future and tried with 18…
Indeed I’ve got a blissful deployment pipeline now. Thanks again!
1 Like